Search Tutorials

Showing posts with label Cool Nails. Show all posts

Tuesday, December 17, 2013

Colorful Mosaic Nail Art

For this tutorial feel free to use any colors you want! they don't have to match just go with what you like.


Step 1:

Paint a corner of your nails any color (I chose purple) don't worry too much about having straight lines because the outline will hide those minor details.

Step 2: 

For this step I used a light green color, paint a vertical line on the other side of your nail. Is okay to go over the purple a little bit.

Step 3:

Now choose another color and make a small triangle in between the purple and the green. Once again don't worry too much about the lines being straight and is okay to go over the other colors a little bit.

Step 4:

Fill in the space that is left with another color.
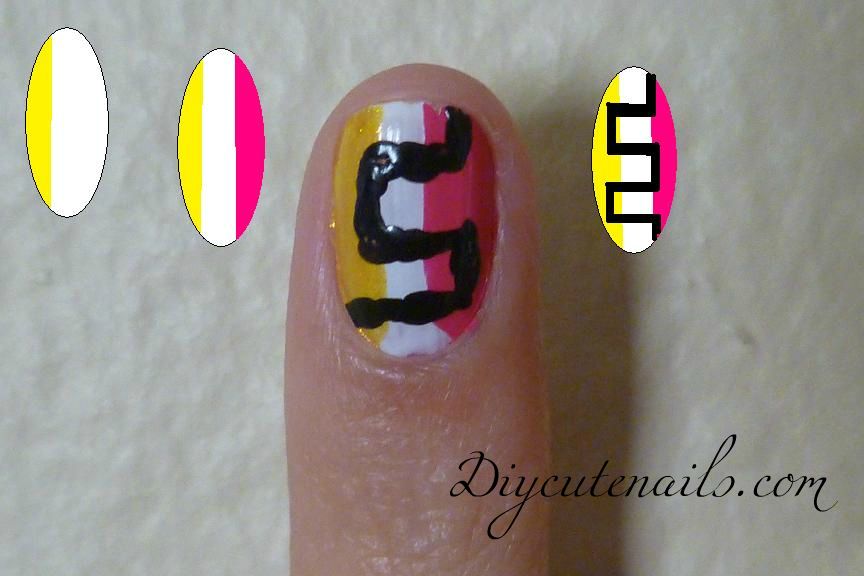
Step 5:

Now here come the more difficult part. Using a very thin brush**, draw the lines surrounding all the shapes. You can use white or black. Make sure you have a steady hand or ask someone for help!
**If you do not have a thin brush just buy a paint brush from the dollar store and cut the little hairs to make a thin brush**

Thursday, December 12, 2013

Snowman - Christmas Nail Tutorial

Christmas is my favorite time of the year, I got this idea to do a snowman nail tutorial and here it is! I hope everyone likes it :)

Happy Holidays!


Step 1: 
Paint all your nails white! or light blue can work too.

Step 2:
Using a dotting tool or the end of a bobby pin, draw the face of your snowman in one nail.

Step 3:
Using a toothpick or a very thin brush draw a little triangle in orange to make the nose of your snowman.

Step 4:
Draw 2 stick arms one on each nail, is very simple just draw a diagonal line and then 2 little little lines at the end to make the hands. I made the arms go in different directions.

Step 5:
Draw a black square and then a line under it to make a hat!

Step 6:
For my last nail I just painted with glitter to give it a snowing look. 

Tuesday, June 25, 2013

Disney's Snow White Nail Art Tutorial


Step 1: Paint all your nails with yellow nail polish, I used a yellow/gold to add shine. 


Step 2: Now pain 3 little mountains at the edge of you nail to make Snow White's dress, this may be a little tricky but be patient!


 Step 3: On your thumb nail paint the apple, this is done by using red nail polish and just paint the top of a heart 


Step 4: With a toothpick draw a brown line coming from the center of the apple and using green nail polish paint a leaf. 


Step 5: With red nail polish paint 3 dots on each blue mountain in the red of the nails, a toothpick can be used if you have small nails. 


I hope you guys like my Snow White nail art tutorial!


Saturday, March 23, 2013

Hello Kitty Nails


As requested by TC!
I had so much fun making this nails but I am a little upset that the quality of the pictures didn't turn out as good as I wanted (I used my camera phone)


Step 1: Paint your nails of any dark color to make the background. I chose black because I like the way it goes so good with white and pink ( Hello kitty colors!)


Step 2: Now we are going to make a very thick white line at the edge pf the nail, kinda like a french tip but way thicker. This is going to be the face.


Step 3: Now is time to make the bow! this might be one of the trickiest part, but it is very easy to make all you have to do is make 2 small triangles and then a circle in the middle. Use a toothpick to dab the pain inside of the shapes


Step 4: Hello Kitty's face time! Okay for this part you might need a thin brush or a toothpick. Make 2 oval shapes in black for the eyes, one yellow circle for the nose, and 2 or 3 lines on each side of the kitty's face for whiskers. 


Thursday, October 18, 2012

Easy Lace Nails


 I absolutely love this easy lace nails design! it is very simple and fast to do and I have gotten great feedback on it today :)


 Step one: Paint all your nails a light blue or aquamarine blue color.
 Step two: Draw a half circle line at the top left corner of your nail using white nail polish.
 Step three: Draw 4 little loops coming out of the line that you did in the previous step
 Step four: Make 3 horizontal lines and 3 vertical line inside of the half circle, this will give it the lace effect.


Step five: Using a tooth pick, draw little dots along the edge of the loops.

Finished!!! 


I hope you all found this tutorial helpful

Friday, October 5, 2012

Fall Inspired Nails.


Fall inspired nails!

Step 1: Paint all your nails a brown


Step 2: Paint orange about 2/3 of the nail leaving a brown tip


Step 3: Paint 1/3 of the nails green leaving a little of the orange showing


Step 4: Using a thing brush and black nail polish make a vertical curvy line, and then more little curvy lines branching out of it.


Step 5: Paint little red dashes of dots along the curvy lines and once is dried paint little yellow dots on top of the red ones.


Tuesday, September 18, 2012

Tribal Nails Art

So this took me soooo long to do but it was worth it :) 

It was very hard to do a photo tutorial for this one because it is so messy and it took me so long, but I did show step by step of each nail design with a drawing sample.


Sunday, September 9, 2012

Leopard Print Nails


Step 1: Paint all your nails with a light brown nails polish 
]

Step 2: Using a dotting tool make various yellow or gold dots, 4-6 per nail and make them random don't fallow a pattern. They can all be different sizes. 

Step 3: Now use a darker shade of brown to make the outline of the spots. This is very easy simply take a thin brush and make 2 lines around the yellow dot, one at the top and one at the bottom. Make the lines curvy and different.

If the yellow dot is big, draw 3 lines and make sure non of the lines are touching each other. 

Repeat in all your nails and done! :) 


Related Posts Plugin for WordPress, Blogger...